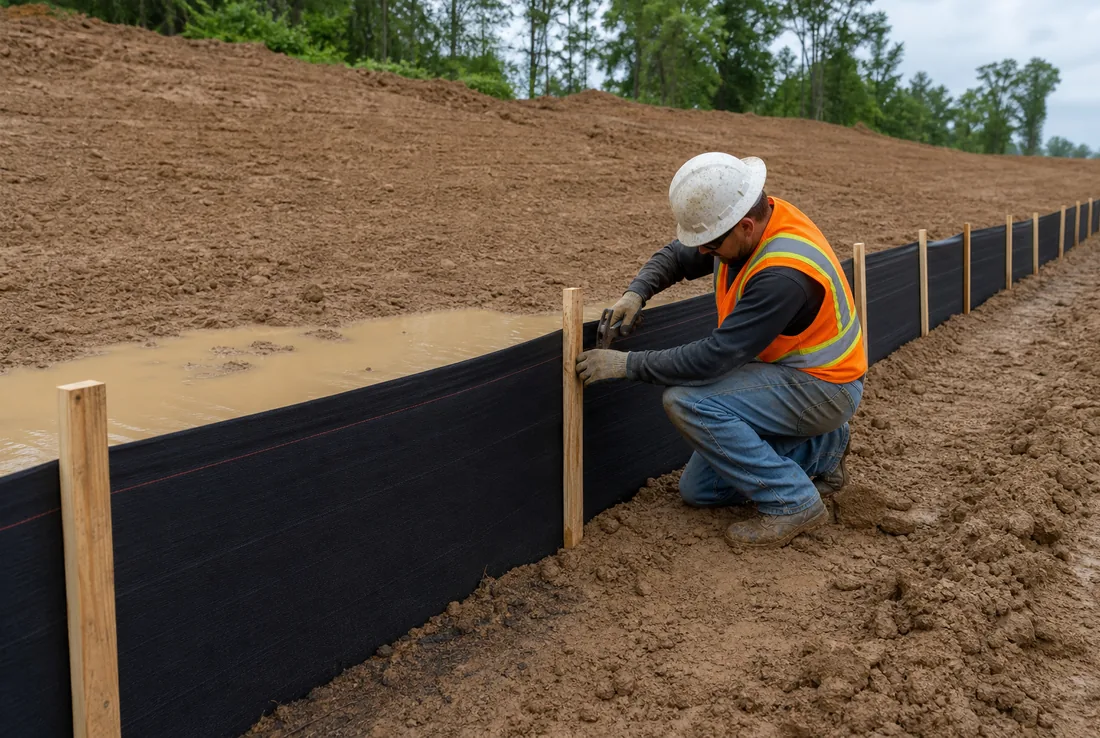
A silt fence is a temporary sediment barrier of geotextile fabric supported by posts, trenched into the ground along the contour of a slope. Performance depends on correct placement, post selection and spacing, a keyed-in trench, and regular maintenance — not on stabbing fabric into the soil. Match the post type and spacing to the project SWPPP or DOT spec.
What is a silt fence?
A silt fence is a temporary sediment-control measure used on construction sites to slow runoff and trap sediment before it leaves the site. It is fabric (geotextile) supported by posts and, on reinforced installations, wire backing. It is a barrier and settling control, not a filter you can place anywhere.
When silt fence is used on construction sites
Silt fence is used down-slope of disturbed soil, around the perimeter of grading and excavation, and around inlets and stockpiles where sheet flow (not concentrated channel flow) needs to be slowed so sediment can settle.
Where to place silt fence
Place silt fence along the contour, so water ponds behind it and drops sediment. Position it down-gradient of disturbed areas with the ends turned uphill in a J-hook to stop water running around the end. Silt fence must never run straight up and down a slope; long perimeter runs are broken into segments with J-hooks so each segment ponds its own water. A common rule of thumb is to keep any single run on the shorter side — many DOT specs cap an unreinforced run near 100 feet (some allow up to ~200 feet for reinforced fence or between J-hooks) — limit the drainage area to roughly 0.25 acre per 100 feet of fence, and set the fence about 5 to 10 feet back from the toe of a slope to leave ponding volume. The governing SWPPP or DOT spec controls these values.
Where not to place silt fence
Do not place silt fence across concentrated flow, in ditches, streams, or channels, or where it will be overtopped. It is not designed for high-velocity or channelized water, and using it there is a common cause of failure and washout.
How to install silt fence step by step
| Step | What to do |
|---|---|
| 1. Mark the line | Lay out the fence on the contour, down-slope of disturbed soil, with ends turned uphill. |
| 2. Dig the trench | Excavate a trench roughly 6 in wide and 6 in deep along the line. |
| 3. Set the posts | Drive posts on the down-slope side at the spec spacing; embed them firmly. |
| 4. Attach the fabric | Fasten geotextile to the posts on the up-slope (water) side; add wire backing if required. |
| 5. Key in the fabric | Lay the fabric bottom into the trench, then backfill and compact so water cannot flow under. |
| 6. Inspect | Check tension, embedment, and overlap before the first rain event. |
Fact: Silt fence posts are typically spaced 6 to 10 feet apart and driven 12 to 18 inches deep, per U.S. EPA stormwater (SWPPP) guidance and state erosion-control standards.
Trenching vs static slicing
There are two accepted ways to get the fabric into the ground, and the method changes how well the fence resists undercutting.
| Method | How it works | Trade-off |
|---|---|---|
| Trenching | Dig a ~6 in deep, ~6 in wide trench, set the fabric in, backfill and compact | Traditional and flexible; loose backfill can saturate and wash out if not compacted |
| Static slicing | A slicing machine cuts a ~12 in slit and inserts the fabric; a wheel compacts the soil | Minimal soil disturbance and tighter compaction; needs a silt-fence machine and open access |
Static slicing is often preferred — and increasingly required — because it disturbs the soil less and compacts it tighter, which is what stops water from running under the fence. It also turns sharply, so it can form J-hooks and follow contours in one pass. Whichever method you use, compaction is the detail that prevents washout: loose, uncompacted soil under the fabric is the most common reason a silt fence undercuts and fails its inspection.
Post options: wood, metal, T-posts, reusable posts
| Post option | Notes |
|---|---|
| Wood stakes | Common, low cost, usually single-use; can split when driven. |
| Steel T-posts | Strong and reusable, but need a driver and clips and can bend over time. |
| U-posts | Lighter duty; better for short, light runs than long reinforced fence. |
| Reusable barrier posts | Where the spec allows, can speed install and teardown and redeploy cleanly across sites. |
The governing project spec or DOT standard usually dictates post type, spacing, embedment, and fabric. Confirm the requirement before substituting any post system.
Common silt fence failures
- Fabric not keyed into a trench, so water flows underneath.
- Posts spaced too far apart or not embedded deeply enough.
- Fence placed across concentrated flow instead of along the contour.
- Drainage area behind the fence too large for it to handle.
- No maintenance: sediment not removed, tears not repaired after storms.
Inspection and maintenance checklist
- Inspect before the first rain and after each significant storm.
- Remove accumulated sediment before it reaches roughly one-third to one-half the fence height. Many specs cap the designed impoundment at about 18 inches and require cleanout at 50% of that — around 9 inches of sediment.
- Repair tears, sags, and undermined sections promptly.
- Re-trench and re-key any section where water is flowing under the fabric.
- Keep the fence in place until the upslope area is stabilized.
When a reusable post system makes sense
Where a reusable post fits — and where it does not
On repeat sites where install and teardown labor is significant and the spec allows the post type, a reusable post system can reduce labor and redeploy cleanly. On a one-time job, or where the spec prescribes a specific post, follow the spec. Silt-fence performance is governed by placement, trenching, spacing, and maintenance — the post is one part of the system.
Budgeting the job rather than installing it? See silt fence cost for per-foot ranges, the cost drivers, and where post choice changes the install-and-teardown total — or estimate the labor side directly with the temporary fence cost calculator.
Need SWPPP post-selection and spec resources?
Download Scepter spec sheets and the SWPPP post-selection material, or send your project so a rep can confirm a spec-compliant setup.
Frequently asked questions
How deep should silt fence posts be?
Silt fence posts are typically driven 12 to 18 inches into the ground for stability, with the fabric trenched in below grade. Always follow the project SWPPP and local spec, which may require specific embedment, spacing, and reinforcement.
How far apart should silt fence posts be?
Silt fence posts are commonly spaced 6 to 10 feet apart, per U.S. EPA stormwater guidance and many state erosion-control standards. Tighter spacing improves support on slopes and tension points. The governing spec controls.
Can you reuse silt fence posts?
Wood stakes are usually single-use. Steel T-posts can be pulled and reused, though they bend and need a driver and clips. Where the spec allows, a reusable post system can reduce install and removal labor across repeat sites, but post type must match the project's erosion-control requirement.
What is a J-hook in silt fence installation?
A J-hook is the end of a silt fence run turned uphill into a J shape so runoff ponds behind the fabric instead of running around the end. On long perimeters, the run is broken into segments with J-hooks so each segment captures its own water along the contour. Many agencies now require J-hooks rather than continuous perimeter runs.
Is trenching or static slicing better for silt fence?
Both are accepted. Trenching digs a roughly 6-inch trench, sets the fabric, and backfills and compacts it. Static slicing uses a machine to cut a slit and insert the fabric with tight compaction and minimal soil disturbance, which better resists undercutting and turns easily to form J-hooks. Slicing is often preferred or required on larger jobs; either way, compaction is what prevents washout.